
I'm trying to get the wipers working on my red van for Craig and I need to know what wires from the switch go where.
-
1970 Chevy Sportvan 90 - "Dazed and Confuzed II"
Lakeville, MN -
Do you have a shop manual or ask for a copy of the wiring diagram, I think there is one somewhere here....my diagram shows a LBL (light blue) from the switch to the motor and a Y (Yellow) from the motor to the fuse box, both 20 ga. Looking at the back of my motor, the blue wire goes to the left terminal, yellow to the right side. Mine didn't work and it was the switch, the inards were worn out, easy to test, touch the blue wire to ground and the wipers should run if the motor is good, that's all the switch does, is connect the motor to ground. Only other problem is that a new correct switch cost around $35 if you can find one....Originally posted by Kustomizer View PostLast edited by Vantasia; 05-24-2014, 03:08 PM.'64 G-10 Panel Van, 194 CI, 3-speed -
my reading of the wiring diagram agrees with jbassLARRY OF THE PACIFIC NW
1965, 292, TH350
purchased Nov. 22, 1970Comment
-
I have a 2 speed switch with washer button, 3 wires off of the switch. does anyone have a diagram of how the switch is wired to the motor and pump? my Van supplement book only shows 1 wire from the switch to the motor. It's a '66 Deluxe.1966 Sportvan Deluxe 230 3 on tree (work in progress) Now 283 small block
1965 Sportvan Deluxe 250 powerglide (Sold)
1966 GMC Handibus Custom 350 3 on treeComment
-
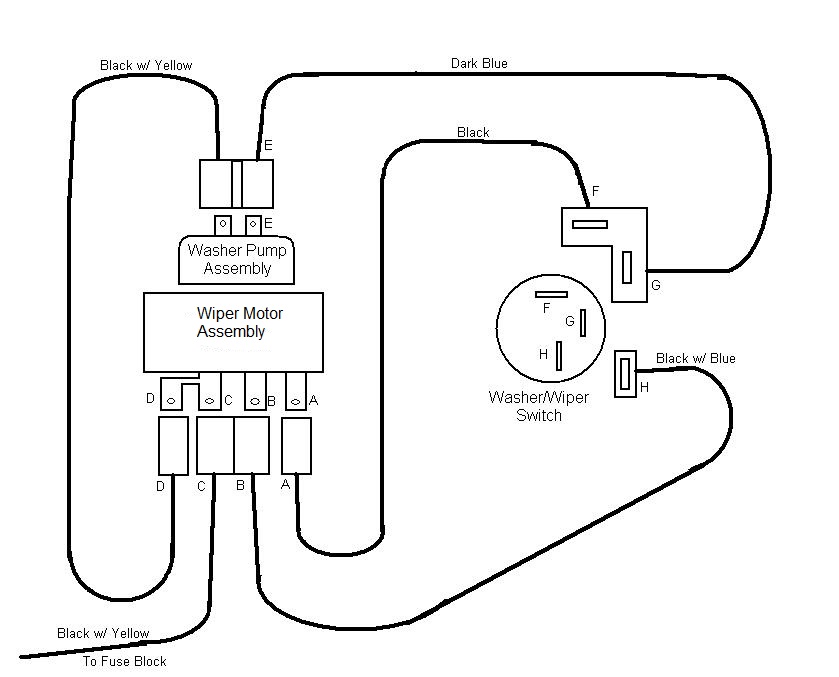
Hi Russell! I went through this with my '65 Deluxe when I finally put my dash back together a few years ago. You're right, there is very little info online about hooking up a 2-speed wiper motor and its washer pump. These two web pages show pretty much the same info, similar to our setup. Note the letters they have assigned to each terminal.

Today I crawled under the dash and took some photos of mine. Quite a while back I was driving in the rain and the wipers moved very slowly, even on the fast speed. And the motor got hot to the touch. So something's wrong. Here's what I found:
I have the switch with two speed settings and the button in the center for washers. It has dark blue and blue/black on one connector and light blue on its own connector. The light blue wire goes into the wire loom and comes back out near the wiper motor. The other two wires go over there too but are not wrapped in the loom.
I bought a new wiper motor and chose the one that has four terminals. The blue/black one from the switch goes to the first terminal (A). The light blue wire from the switch goes to (B). The yellow wire comes out of the loom, from the fuse box. It's 12V and on with the ignition. I've got it going to (C). The final terminal, (D), is tied to (C). So, if you have the washer option, the washer gets its power from here.
The washer motor is under the black plastic cover. I've got the dark blue wire from the switch going here, to (E). And the yellow wire is not connected to anything! It obviously goes to (D) to tap into the 12V from (C). Not sure why I disconnected it. I rebuilt my washer pump and put some new seals in it but it still didn't work afterwards.
My van's previous owner had bypassed the stock washer and added a continuous-flow pump. I may have to do the same. The stock pump is much like a locomotive! The continuous-flow pumps are so simple. The one web page shows how to rewire it for this.
Comparing these diagrams to my setup, I think I wired mine right. I could try swapping the light blue with the dark blue. First I will test out the switch I with a meter. Maybe the switch has a bad ground.
Let me know how yours turns out, Russell.Attached FilesVANagainComment
-
-
That's awesome! Thanks. The diagram link is what I was looking for. It appears that I have a ground issue with the switch not making contact since both the motor and pump have constant power when ign. is on. I will try to hot wire the pump and see if it works. If not I will use the by-pass diagram to add a constant flow pump I already have from a PT cruiser with a large tank.
I wasn't sure how to use it with the original button on the switch. With that diagram I should be able to get it working easily.1966 Sportvan Deluxe 230 3 on tree (work in progress) Now 283 small block
1965 Sportvan Deluxe 250 powerglide (Sold)
1966 GMC Handibus Custom 350 3 on treeComment
-
I took a picture of the diagrams with my phone. I can blow them up while in the garage.
Thanks again.1966 Sportvan Deluxe 230 3 on tree (work in progress) Now 283 small block
1965 Sportvan Deluxe 250 powerglide (Sold)
1966 GMC Handibus Custom 350 3 on treeComment
Comment