Upgrading Cam

Collapse
X
 
  • Filter
  • Time
  • Show
Clear All
new posts
  • kookykrispy
    VCVC Member
    • Oct 2002
    • 8565

    #16
    hard to beat Delta cam!

    Originally posted by 66BeachCruiser View Post
    Wow, talk about more than reasonable. I called Delta, with the plan for calling Comp Cams, and Howard's after but after talking to the guy at Delta I didn't even bother. Going to send my CAM as a core in the mail and send it over to them. After talking details on the type of use I want out of my motor, a 207 or 208 grind was recommended. He asked if I needed lifters and said I do. I asked if he carried timing gears as well. He said yes. I asked if they would put it on for me. No more nylon gear. He said they would install it for me. Not until the end did I ask what I was looking at as far as price. He said camshaft and lifters were going to be about 100. Extra for gear but great price.
    That's awesome. Yes I love Delta camshaft. They are like a well kept secret. I will never buy an off the shelf cam again. Why would you, when you can get a custom grind for less money? I put a custom delta cam in the supercharged 400 that I built for Hella Sunshine, I have a custom delta grind in the 350 in my '68 camaro, and I put a custom delta roller cam in the 454 I built for my buddy's chevelle. Each build was great and the cam seemed perfect for each application. And their prices are always lower than you would expect. Don't forget to ask for your free t-shirt!


    64' wikivan 292 tripower/4 speed/2.56 posi
    '64 Red Baron no engine/trans
    '66 "Lucky" 230/3 onda tree/project.. soon to be 400SBC/200r/3.73 posi

    Originally posted by Vanner68
    Remember, they're still printing money, but they aren't making any more earlies!

    Comment

    • 66BeachCruiser
      VCVC Member
      • Sep 2009
      • 1176

      #17
      I put my CAM with nylon gear still in place in a box and shipped it on its way to Delta Camshafts. Can't wait to hear from them once they receive it.

      I went to ship it to a local shipping store that does shipping through UPS, FedEx, and USPS because I didn't want to waste further time in FedEx and USPS websites trying to figure out price. I wanted a quote before committing to shipping this box. It was 41" long by 7"x7". Weighed 14bs. Didn't realize that's all it weighed. But price to ship was ridiculous at this store. $140, $120, Over $100!! I was mad. I said I wanted the cheapest way possible. No hurry on shipping. He said I can discount $10 but that is still about $90. No way! I was even asking if maybe I got a smaller box. I couldn't picture a business sending me a $100 cam and lifters and paying $100 to ship to me. Or charging $100 to ship. It should be the same thing me shipping the other way. I said I'd be back and check out my options. If He could discount that meant for me, that wasn't the final/real price. I drove a distance to a FedEx location and I said the cheapest way possible. The lady never weighed it, just measured and said ground is the cheapest. It was about $20. I was happy. Can't believe either the guy couldn't find the ground/cheapest option or he was just a rip off. I can do $20 and I'm sure if I took the gear off and made a skinnier box it would have been cheaper. Just a warning for you all. Sorry for the rant! Happy Thanksgiving! Spending it in Scottsdale Arizona Today.
      1966 Chevy Sportvan seafoam green/white
      Sliding ragtop
      230 straight six
      HEI distributor
      12SI alternator
      2bbl 32/36 Progressive carb upgrade with 1 to 2bbl carb adapter
      200r4 w/stock auto shifter, custom hanger, 96 suburban trans cooler
      3:36 rear
      Front Disk Brake conversion with Dual master
      Recored radiator to 3core
      5 blade fan
      belly pan.

      Comment

      • joyrde
        VCVC Member
        • Jan 2002
        • 2876

        #18
        Originally posted by 66BeachCruiser View Post
        I put my CAM with nylon gear still in place in a box and shipped it on its way to Delta Camshafts. Can't wait to hear from them once they receive it.

        I went to ship it to a local shipping store that does shipping through UPS, FedEx, and USPS because I didn't want to waste further time in FedEx and USPS websites trying to figure out price. I wanted a quote before committing to shipping this box. It was 41" long by 7"x7". Weighed 14bs. Didn't realize that's all it weighed. But price to ship was ridiculous at this store. $140, $120, Over $100!! I was mad. I said I wanted the cheapest way possible. No hurry on shipping. He said I can discount $10 but that is still about $90. No way! I was even asking if maybe I got a smaller box. I couldn't picture a business sending me a $100 cam and lifters and paying $100 to ship to me. Or charging $100 to ship. It should be the same thing me shipping the other way. I said I'd be back and check out my options. If He could discount that meant for me, that wasn't the final/real price. I drove a distance to a FedEx location and I said the cheapest way possible. The lady never weighed it, just measured and said ground is the cheapest. It was about $20. I was happy. Can't believe either the guy couldn't find the ground/cheapest option or he was just a rip off. I can do $20 and I'm sure if I took the gear off and made a skinnier box it would have been cheaper. Just a warning for you all. Sorry for the rant! Happy Thanksgiving! Spending it in Scottsdale Arizona Today.
        For converstaion - - ONLY - - - each of us have our preferred methods, vendors, "go-to's" - - - - Like KK & Delta, I have always found Comp Cam spot on with recommendations - - - for BC's build - - - this is the recommended Cam & Kit - - - $354.00 delivered - - - if there is an issue free return shipping - - - for me, with Summit Racing 40 minutes away - - - no return hassles, ever

        The Cam Kit - - http://www.compperformancegroupstores.com/store/merchant.mvc?Screen=PROD&Store_Code=CC&Product_Code=K61-233-4&Category_Code=

        through Summit - - https://www.summitracing.com/search?SortBy=BestKeywordMatch&SortOrder=Ascending&keyword=K61-233-4


        Comment

        • 66BeachCruiser
          VCVC Member
          • Sep 2009
          • 1176

          #19
          Today, I received my camshaft from Delta. It came in the same box I sent it in but new cam was wrapped better. The Cam came with new cam timing gear in place. It came with the pair of aluminum gears and a set of lifters. I unpacked it out of the box because I couldn't wait but haven't unwrapped it as I was on my way out. I also ordered a camshaft bearing removal /installer tool. I will be removing the old bearings. There's a chance I leave the last bearing in there unless I unbolt the transmission. I put the cam back in the box. I'll probably continue cleaning the block and painting it until the tool kit gets here. It doesn't seem they included any break in product or instructions. Any recommendations...
          Attached Files
          1966 Chevy Sportvan seafoam green/white
          Sliding ragtop
          230 straight six
          HEI distributor
          12SI alternator
          2bbl 32/36 Progressive carb upgrade with 1 to 2bbl carb adapter
          200r4 w/stock auto shifter, custom hanger, 96 suburban trans cooler
          3:36 rear
          Front Disk Brake conversion with Dual master
          Recored radiator to 3core
          5 blade fan
          belly pan.

          Comment

          • TurboVan
            VCVC Member
            • Dec 2000
            • 6438

            #20
            Yes, you need some kind of break-in/assembly lube containing moly like Isky Rev-Lube, and then use an oil containing zinc like Valvoline VR1.
            Last edited by TurboVan; 12-15-2018, 12:54 AM.
            Keep one foot in the gutter, one fist in the gold...sigpic

            '65 Panel, with turbocharged 327 (originally 153 four), TH400 (originally 3-speed), and 3.31 '67 Camaro 12 bolt rear (my first car, 1970)
            https://www.youtube.com/playlist?lis...meE_Jf-hgJU2mG

            '69 Sportvan 108 with turbocharged original 250 six and 700R4 (originally Powerglide), 3.73 rear, starred in eight Taco Bell commercials
            https://www.youtube.com/watch?v=kDfPJ3xmwjY

            Comment

            • 66BeachCruiser
              VCVC Member
              • Sep 2009
              • 1176

              #21
              Yesterday I began removing the old camshaft bearings. I used my new cam bearings removal tool. Easy enough to use. The rubber sleeves that go on the unit of the tool where the bearing is placed made sliding the bearings real difficult. It was too tight. Too tight that the rubber ripped when removing the bearings. I tried a thinner rubber and same effect. For the first bearing I only used the small extension portion of the tool due to clearance issues in front of the engine. You need enough room to smack the tool with a hammer. I used a socket at the end of the small extension to be able to hit it with a hammer. I used the long tube with the rest of the bearings 2 and 3 since it goes deeper into the block. I ordered cam bearings from 12bolt.com (king brand) since Tom recommend these on his site. I got disappointed in opening the box and feeling the bearings. I had to file some outer rough jagged edges down on all bearings. And one had a scratch in the middle. Luckily it was not going to be used since I was not removing the 4th one from my block.
              Attached Files
              1966 Chevy Sportvan seafoam green/white
              Sliding ragtop
              230 straight six
              HEI distributor
              12SI alternator
              2bbl 32/36 Progressive carb upgrade with 1 to 2bbl carb adapter
              200r4 w/stock auto shifter, custom hanger, 96 suburban trans cooler
              3:36 rear
              Front Disk Brake conversion with Dual master
              Recored radiator to 3core
              5 blade fan
              belly pan.

              Comment

              • 66BeachCruiser
                VCVC Member
                • Sep 2009
                • 1176

                #22
                So today I was able to install the new bearings. I did check the last bearing and no scouring was felt. The important part about installing new cam bearings is to align the oil holes. If you don't, the rest of the engine will not get the necessary lubrication, and definite catastrophe will happen.On my first attempt I tried to eye it with just a line on the hole in the inner and outer parts of the bearing and I was close but no cigar. If you look carefully at the first picture you can see the whole in the bearing not aligned to the block oil hole. I needed to figure out a strategy that would work. First, I needed to press out this new bearing and try again. I placed the new bearings in front of their respective cavity and aligned the oil hole by a marker line I drew on the bearing face. Then I drew a marker line at the 6 o'clock mark so I can visually see a visual center while under the van to drive the bearing in accurately. It worked out great. Right on the mark, aligning the oil holes perfectly.
                Attached Files
                1966 Chevy Sportvan seafoam green/white
                Sliding ragtop
                230 straight six
                HEI distributor
                12SI alternator
                2bbl 32/36 Progressive carb upgrade with 1 to 2bbl carb adapter
                200r4 w/stock auto shifter, custom hanger, 96 suburban trans cooler
                3:36 rear
                Front Disk Brake conversion with Dual master
                Recored radiator to 3core
                5 blade fan
                belly pan.

                Comment

                • 66BeachCruiser
                  VCVC Member
                  • Sep 2009
                  • 1176

                  #23
                  The front bearing was installed last. I used the small extension once again. I used only a mark at the outer bearing surface to align the oil hole since I was not going to be under the van. This mark would be visible from the top as I drove it in. The other bearings were aligned first with the marks and then blindly smacked in slowly. When I thought I finished driving this last front one in the oil hole was not aligned. It looked like it needed to be pressed in further to be just right with the hole. I rechecked a picture with the original bearing and it was further in. So I went ahead and pressed it in further. The hole lines up. Time for Camshaft install. But first I will be removing the crankshaft gear with a puller. Wish me luck.
                  Attached Files
                  Last edited by 66BeachCruiser; 12-20-2018, 05:26 PM.
                  1966 Chevy Sportvan seafoam green/white
                  Sliding ragtop
                  230 straight six
                  HEI distributor
                  12SI alternator
                  2bbl 32/36 Progressive carb upgrade with 1 to 2bbl carb adapter
                  200r4 w/stock auto shifter, custom hanger, 96 suburban trans cooler
                  3:36 rear
                  Front Disk Brake conversion with Dual master
                  Recored radiator to 3core
                  5 blade fan
                  belly pan.

                  Comment

                  • 66BeachCruiser
                    VCVC Member
                    • Sep 2009
                    • 1176

                    #24
                    These are the original bearings. Surprisingly the front bearing (#1) was not too bad. The 2nd and 3rd were bad. Glad I replaced them. The 4th one was left in the block. It felt smooth. I have to add a disclosure. Bearing inner diameters are all the same but outer diameters are different. I had taken out all new bearings from the box. They were shipped in order. I mixed them up. I didn't know. I thought they were all the same size until I saw part numbers on the box. Luckily I marked my old bearings as I took them out. I measured and re measured and matched measurements to new bearings. I repeated to make sure. The # 1 and 4 are bigger (size 5.11/picture) and middle 2 and 3 are smaller ( size 5.09/picture)outer diameters. So, bearings 1 and 4 are part number CH 5-2, and bearings 2 and 3 are CH 5-3. This is from memory so if incorrect I'll come back and correct them.
                    Attached Files
                    Last edited by 66BeachCruiser; 12-20-2018, 05:44 PM.
                    1966 Chevy Sportvan seafoam green/white
                    Sliding ragtop
                    230 straight six
                    HEI distributor
                    12SI alternator
                    2bbl 32/36 Progressive carb upgrade with 1 to 2bbl carb adapter
                    200r4 w/stock auto shifter, custom hanger, 96 suburban trans cooler
                    3:36 rear
                    Front Disk Brake conversion with Dual master
                    Recored radiator to 3core
                    5 blade fan
                    belly pan.

                    Comment

                    • 66BeachCruiser
                      VCVC Member
                      • Sep 2009
                      • 1176

                      #25
                      Ok, just came out to remove the crank gear with a 3 arm type puller and the clearance on the bottom is not big enough to fit the ends of the puller and the top of the gear has no space behind it to allow a puller. I removed the woodruff key first.

                      How do remove this gear? And what's an appropriate tool to use? Looks like maybe a 2 arm type puller with thinner ends? Help if anyone has done it before. In the meantime I'll be looking for a different puller.
                      Attached Files
                      1966 Chevy Sportvan seafoam green/white
                      Sliding ragtop
                      230 straight six
                      HEI distributor
                      12SI alternator
                      2bbl 32/36 Progressive carb upgrade with 1 to 2bbl carb adapter
                      200r4 w/stock auto shifter, custom hanger, 96 suburban trans cooler
                      3:36 rear
                      Front Disk Brake conversion with Dual master
                      Recored radiator to 3core
                      5 blade fan
                      belly pan.

                      Comment

                      • panelmanrd
                        VCVC Member
                        • Oct 2009
                        • 2022

                        #26
                        that gear is a bitch to get off, it usually runs against a gear
                        that is fiber and never wears out, it is harder than the fiber gear
                        and an aluminum replacement gear, it theory it should never need
                        changing. I`d leave it there and assemble it.
                        54 chevy panel truck 355 tpi 700r4 325/9in
                        64 chevy 90 5.7 tpi 700r4 336 8.2
                        69 chevy panel van 5.7 tbi 700r4 336 8.2

                        Comment

                        • 66BeachCruiser
                          VCVC Member
                          • Sep 2009
                          • 1176

                          #27
                          Originally posted by panelmanrd View Post
                          that gear is a bitch to get off, it usually runs against a gear
                          that is fiber and never wears out, it is harder than the fiber gear
                          and an aluminum replacement gear, it theory it should never need
                          changing. I`d leave it there and assemble it.
                          My new CAM came with a new aluminum Cam gear attached (no more nylon) and came with a new aluminum crankshaft Gear for me to install. This original type gear on the crankshaft looks like it could be steel. I don't want to mix metals by leaving this gear on. One gear may be stronger than the other and eat it up.
                          1966 Chevy Sportvan seafoam green/white
                          Sliding ragtop
                          230 straight six
                          HEI distributor
                          12SI alternator
                          2bbl 32/36 Progressive carb upgrade with 1 to 2bbl carb adapter
                          200r4 w/stock auto shifter, custom hanger, 96 suburban trans cooler
                          3:36 rear
                          Front Disk Brake conversion with Dual master
                          Recored radiator to 3core
                          5 blade fan
                          belly pan.

                          Comment

                          • jrinaman
                            VCVC Member
                            • Apr 2011
                            • 2545

                            #28
                            if your determined to change the gear (I would leave it) use 2 small chisels as wedges to force it off. beat them in between block and gear and keep both snug/tight. a little heat helps. if still not budging, beat the chisels in as tight as you can and then tap on the crank forcing it into the gear. while a good solid smack will pop it right off, you do not want to damage the end of crank. if it is tapped/threaded, install bolt with a few washers and hit I as hard as you can. plan on buying a new bolt.
                            '64 chevy, 292 40 over, 206/526 cam, 2004r trans. 9.75:1, dual webbers, Langdon cast headers, 1.94 valves

                            Comment

                            • Vanner68
                              VCVC Charter Member
                              • May 2000
                              • 13554

                              #29
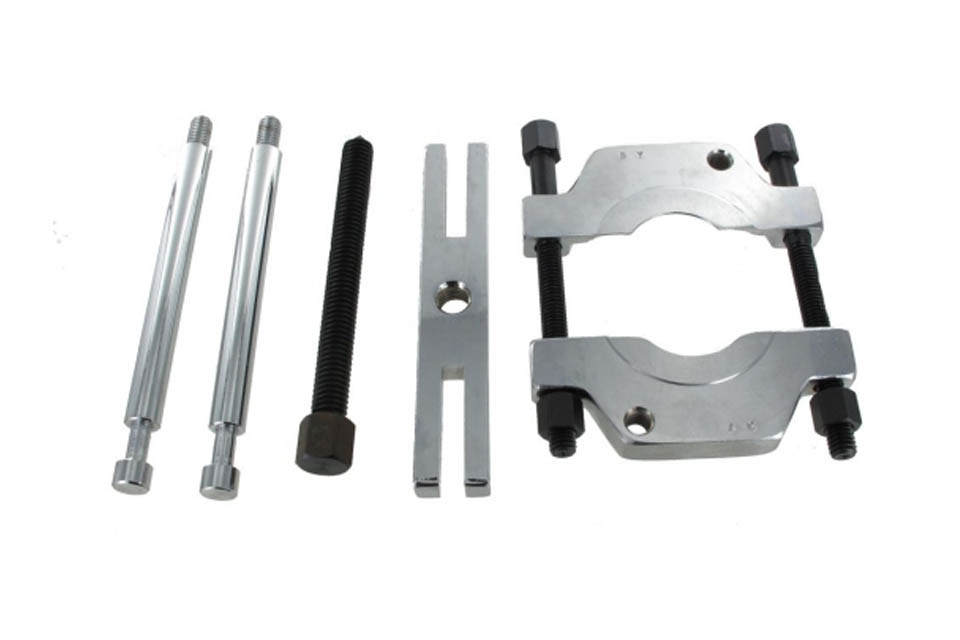
                              You need this style puller:

                              Gregg Groff


                              There's no place like 127.0.0.1

                              1968 Chevy G20 108 panel Now with 454 power!

                              1965 Chevy G10 panel- OHC Pontiac inline 6

                              Comment

                              • 66BeachCruiser
                                VCVC Member
                                • Sep 2009
                                • 1176

                                #30
                                Thanks guys for the suggestions. If having an aluminum cam gear and a steel crank gear is not a known problem I will leave it. I was just going to replace it with Aluminum so it can be aluminum to Aluminum gears.
                                1966 Chevy Sportvan seafoam green/white
                                Sliding ragtop
                                230 straight six
                                HEI distributor
                                12SI alternator
                                2bbl 32/36 Progressive carb upgrade with 1 to 2bbl carb adapter
                                200r4 w/stock auto shifter, custom hanger, 96 suburban trans cooler
                                3:36 rear
                                Front Disk Brake conversion with Dual master
                                Recored radiator to 3core
                                5 blade fan
                                belly pan.

                                Comment

                                Working...
                                X